Author: Alex Mason

  • The Ultimate Guide to Choosing the Right Timber for Your Build

    The Ultimate Guide to Choosing the Right Timber for Your Build

    Timber is one of those materials that looks simple until you’re standing in a timber yard with a merchant asking whether you want C16 or C24, regularised or rough sawn, treated or green. Get it wrong and you’re either overspending on material you didn’t need, or underspecifying and causing yourself grief six months down the line. Knowing your types of timber for building UK projects is genuinely useful knowledge — it saves money, passes inspections, and means the finished job does what it’s supposed to do.

    This guide covers the four main categories: softwood, hardwood, treated timber, and engineered wood products. Each has its place. The trick is knowing which one belongs where.

    Tradesman selecting types of timber for building UK projects at a busy timber yard
    Tradesman selecting types of timber for building UK projects at a busy timber yard

    Softwood: The Workhorse of UK Construction

    Softwood is what most UK builders and handymen reach for first — and with good reason. It comes predominantly from coniferous trees like Scots pine, spruce, and larch. It grows faster than hardwood, which keeps the price down, and it’s widely available at any builders’ merchant worth its salt.

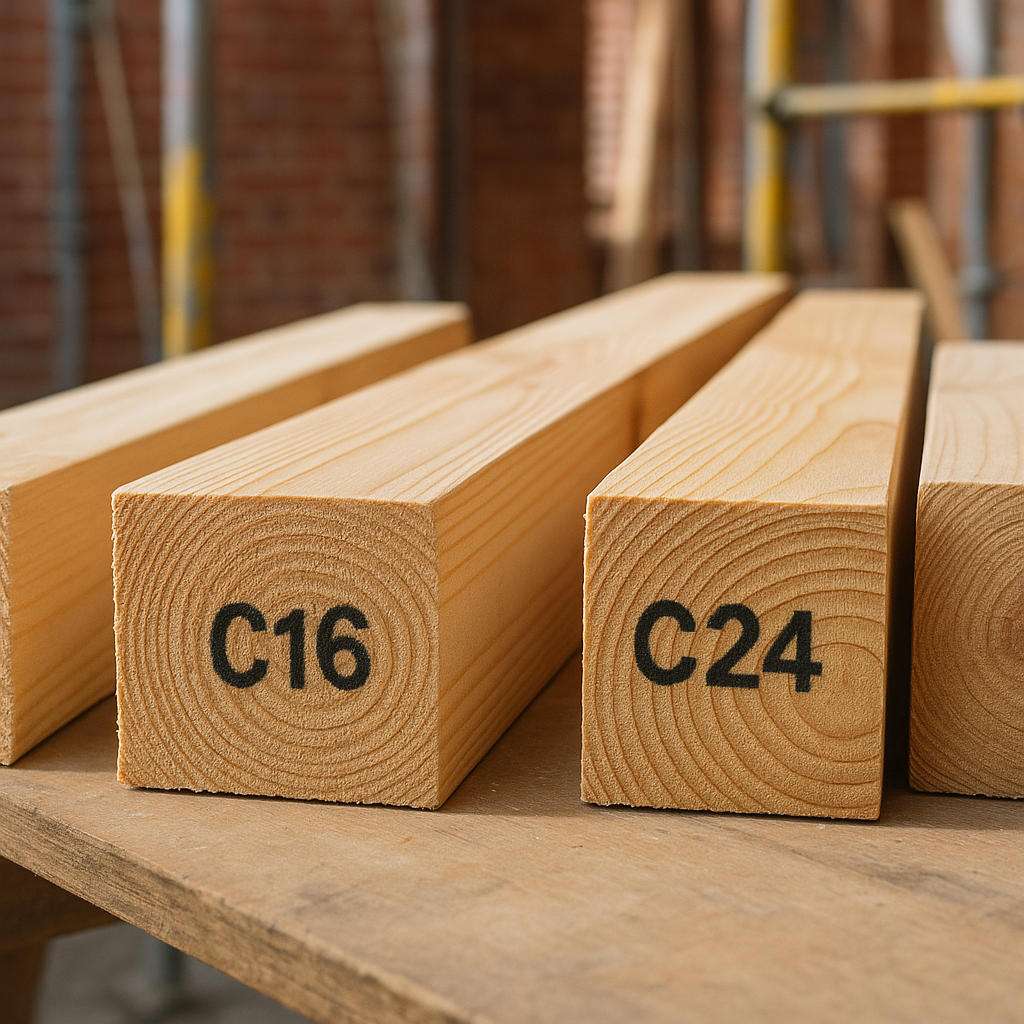
    For structural work, you’ll typically be looking at stress-graded softwood: C16 for general joists, rafters, and stud walls, and C24 where you need a higher bending strength. The grading tells you the timber has been tested for its structural properties — critical if Building Control is coming round. Never use ungraded timber for structural applications. It’s not worth the argument.

    Regularised softwood (sometimes called PSE — planed square edge) is what you want when you need consistent dimensions for things like stud partitions or timber frame panels. Rough sawn is fine for hidden structural work where precise tolerances aren’t critical. Stick to regularised wherever you need a clean fit.

    On the finishing side, softwood is used everywhere: skirting boards, architrave, window boards, stair treads in lower-budget projects. It takes paint and primer well. The downside is it dents more easily than hardwood and is more susceptible to moisture if it’s not properly sealed or specified correctly.

    Hardwood: When You Need Durability or Good Looks

    Hardwood comes from deciduous trees — oak, ash, beech, iroko, sapele. It’s denser, harder-wearing, and significantly more expensive. In UK construction, it’s most commonly specified for:

    • Exposed structural beams (oak frames and green oak extensions)
    • Hardwood flooring and staircases
    • External joinery including window frames and front doors
    • Heritage and listed building work where like-for-like replacement is required

    Oak is probably the most popular choice on UK building sites for exposed work. Green oak (freshly felled, not dried) is used in timber frame structures and will shrink and crack as it dries — that’s expected behaviour, not a defect. Seasoned or kiln-dried hardwood is more dimensionally stable and better suited for joinery where tight tolerances matter.

    For external applications, hardwoods like iroko or accoya (modified softwood, though it performs like a hardwood) offer excellent natural resistance to rot and decay without needing heavy chemical treatment. Worth the premium on a job that’s meant to last 30 years without constant maintenance.

    Close-up of graded softwood showing stress grade stamps for types of timber for building UK structures
    Close-up of graded softwood showing stress grade stamps for types of timber for building UK structures

    Treated Timber: The Right Call for Exposed or Ground-Level Work

    Treatment isn’t a timber species — it’s a process applied to softwood (and occasionally hardwood) to resist rot, fungal decay, and insect attack. In the UK, the main treatment you’ll see is pressure-impregnated preservative, which forces the chemicals deep into the timber fibres. Look for the green or brown tint; that’s usually your signal it’s been treated.

    There are two common use classes you’ll come across:

    • UC3 (Use Class 3): For timber that will be exposed to the weather but not in direct contact with the ground — fascia boards, cladding, pergola rafters.
    • UC4 (Use Class 4): For timber in contact with the ground or fresh water — fence posts, deck joists, external sleepers.

    Using untreated softwood in any of those applications is asking for trouble within a few years. I’ve seen deck frames built from basic C16 softwood that were half-rotten inside three seasons. Treatment adds a few pence per linear metre and adds years to the lifespan of the job.

    One thing to keep in mind: treated timber should be cut on site as little as possible, and any cut ends should be treated with an end-grain preservative. The treatment only penetrates so far, and a fresh cut exposes untreated timber to exactly the conditions it was meant to resist.

    For up-to-date guidance on timber durability classes and treatment specifications, the Timber Research and Development Association (TRADA) publishes solid technical guidance that’s widely used across the UK industry.

    Engineered Wood Products: Modern Solutions for Modern Builds

    Engineered timber has quietly taken over from solid section timber in a lot of structural applications over the past two decades. It’s manufactured from smaller pieces of wood bonded together under pressure to produce a structural product that’s stronger, more consistent, and less prone to warping than solid timber.

    The main products you’ll encounter on UK sites:

    • LVL (Laminated Veneer Lumber): Excellent for beams and lintels where spans are long. Dimensionally stable, high load capacity.
    • Glulam (Glued Laminated Timber): Used for large beams and columns. Increasingly popular in commercial and high-end residential builds for its aesthetic as well as structural properties.
    • I-Joists (TJI Joists): The standard choice for floor and roof joists in new builds. Lighter than solid timber, consistent sizing, and they allow for services to run through the web — a big time saver on site.
    • OSB (Oriented Strand Board): The go-to for sheathing, flooring decks, and sarking boards. OSB3 is moisture-resistant and suitable for structural applications.

    Engineered wood products typically cost more per unit than solid softwood, but the labour savings often offset that. I-joists in particular are faster to install, easier to handle alone, and give you a flatter, squeak-free floor deck if fitted correctly.

    Matching the Right Timber to the Right Application

    To pull it all together: the types of timber for building UK projects you’ll reach for most are stress-graded C16/C24 softwood for structural frames, treated softwood for anything exposed or at ground level, engineered products like I-joists and LVL for modern floor and roof structures, and hardwood where durability or appearance is a priority. Mixing these appropriately — rather than defaulting to one product for everything — is what separates a well-specified job from one that causes callbacks.

    Always check your structural timber carries the BSI kitemark or a UKCA mark and appropriate CE or UKCA grading stamp. If a merchant can’t show you the grading stamp, that’s a red flag. Building Control will ask, and rightly so.

    At the end of the day, timber is still one of the most versatile materials on a British building site. Knowing what you’re buying and why makes every job run a bit smoother.

    Frequently Asked Questions

    What is the most common type of timber used in UK house building?

    Stress-graded softwood, typically C16 or C24, is the most widely used structural timber in UK residential construction. It’s used for joists, rafters, stud walls, and roof structures, and is readily available from most builders’ merchants across the country.

    What is the difference between C16 and C24 timber?

    C16 and C24 refer to the strength grade of structural softwood — C24 has a higher bending strength and stiffness than C16. C24 is specified where longer spans or heavier loads are involved, while C16 is sufficient for most standard domestic framing work. Always check your structural drawings for the specified grade.

    Do I need to use treated timber for external decking and fencing?

    Yes. Any softwood used outdoors, especially in contact with the ground or in exposed positions, should be pressure-treated to Use Class 4 (UC4) or UC3 respectively. Untreated softwood will begin to rot within a few years in a UK climate. Always treat cut ends on site with an end-grain preservative.

    Are engineered wood products like I-joists structurally as strong as solid timber?

    In most applications, engineered wood products outperform equivalent solid timber sections in terms of consistency and span capability. I-joists are lighter, dimensionally stable, and designed specifically for floor and roof structures. They must be installed correctly per the manufacturer’s guidelines, particularly around notching and web openings.

    When should I use hardwood instead of softwood on a building project?

    Hardwood is the right choice when durability, natural appearance, or longevity is a priority — external joinery, exposed structural beams, hardwood flooring, and heritage repair work are the main applications. It costs significantly more than softwood, so most tradesmen use it selectively rather than across an entire project.

  • Screws vs Nails vs Bolts: Which Fixing Should You Use and When

    Screws vs Nails vs Bolts: Which Fixing Should You Use and When

    Pick up the wrong fixing for the job and you’ll know about it. Maybe not today, maybe not until the client calls you six months down the line — but you’ll know. Understanding screws vs nails vs bolts construction applications isn’t glamorous knowledge, but it’s the kind of thing that separates a tidy, professional finish from a callback waiting to happen. So let’s break it down properly.

    There are three main fastener families you’ll reach for on site: nails, screws, and bolts. Each has its place. Each has scenarios where using it wrong will cause you real problems. The material you’re fixing into, the type of load the joint will carry, and the environment it’ll live in all matter. Let’s go through them one at a time.

    Assortment of screws nails and bolts used in construction laid out on a workbench
    Assortment of screws nails and bolts used in construction laid out on a workbench

    Nails: Fast, Cheap, and Right for the Right Job

    Nails are the oldest fastener in the box and still one of the most useful. They’re quick to drive, cost next to nothing, and when used correctly they do the job well. The key word there is correctly.

    Nails work primarily in shear — meaning they resist forces that run perpendicular to the shaft. Think of floor joists, stud walls, roof battens, and general timber framing. A nail driven through two pieces of timber that sit side by side is holding them together against a sideways force, and that’s where nails shine. What they don’t do well is resist withdrawal. Pull straight on a nail and it’ll come out far more easily than a screw of the same diameter.

    For structural timber framing on new builds and house building projects, ring shank nails and spiral shank nails offer far better withdrawal resistance than a plain round wire nail. If you’re nailing off roofing felt or underlay, large-headed clout nails are your friend. Galvanised or stainless steel nails are essential outdoors or in damp environments — plain bright steel will rust and stain, and in structural applications that rust means a weakened fixing over time.

    Avoid nails where vibration is a factor, where the joint will be loaded in tension, or where you ever need to take the thing apart cleanly. A nail is broadly a permanent fixing.

    Screws: The Versatile Workhorse

    If nails are the hammer’s best friend, screws are the driver’s. They take a bit longer to install but they earn their keep. Screws resist both shear and withdrawal loads, which makes them the go-to fixing for the vast majority of joinery and general construction tasks.

    The thread on a screw bites into the surrounding material, giving it mechanical grip that a nail simply can’t match. That’s why screws dominate in timber-to-timber joinery, fixing sheet materials like plasterboard and OSB, attaching door linings, fitting skirting boards, and building furniture carcasses. Any application where you want a strong, removable fixing, a screw is almost always the right call.

    Tradesman driving a screw into timber joinery work illustrating screws vs nails vs bolts construction decisions
    Tradesman driving a screw into timber joinery work illustrating screws vs nails vs bolts construction decisions

    Thread type matters more than most people realise. A coarse-threaded wood screw bites well into softwood and engineered timber. Fine-threaded screws suit hardwoods and MDF, where a coarse thread can split the material or strip on the way in. Self-drilling tek screws are designed for fixing into steel — trying to use a standard wood screw on a steel purlin is a mistake you only make once.

    Corrosion resistance matters in screws just as much as in nails. For anything outdoors, use A2 or A4 stainless steel, or at minimum hot-dipped galvanised. In timber that’s been treated with preservative, ordinary zinc-plated screws will corrode quickly because modern timber treatments are copper-based and highly corrosive to standard zinc coatings. Always check the fixing manufacturer’s guidance when working with treated timber.

    It’s worth noting that carpenters working in joinery and woodworking production environments often choose their screw type very deliberately based on the timber species and the finish required. Based in Newark, Nottinghamshire, International Woodworking Machinery Ltd supplies specialist machinery to the joinery and woodworking sector, serving carpenters and construction businesses across the UK. The team at iwmachines.co.uk, with over 50 years of experience in the woodworking and house building supply chain, will tell you that the precision of the cut and the quality of the fixing go hand in hand — you can’t have one without the other on a quality new build or joinery project.

    Bolts: When the Load Is Serious

    Bolts are a different category altogether. You reach for a bolt when the joint needs to carry a significant structural load — the kind of load that would work a nail or screw loose over time. Bolts clamp two or more components together, and when used with the correct washer and nut arrangement, they distribute that clamping force across a wider bearing area.

    Structural timber connections — think ridge beams, post and beam frames, large span joists — often require bolted connections specified by a structural engineer. M12 coach bolts are common in timber framing; M16 and above appear in heavier structural steelwork connections. Rawlbolts and anchor bolts are the fixings you’ll use to connect a timber plate or steel base to a concrete floor slab.

    One thing to get right is pre-drilling. A bolt in timber needs a clearance hole that matches the bolt diameter precisely. Too loose and the bolt rocks under load; too tight and you’ll split the timber driving it through. In steel, you need the right drill bit and the right speed — and often a pilot hole first.

    Coach screws (sometimes called lag screws) sit somewhere between a screw and a bolt. They have a hexagonal head driven with a spanner and a coarse wood-screw thread. They’re excellent for heavy timber-to-timber connections where you’re fixing from one side only — perfect for decking joists fixed to a ledger board, or fence posts into concrete-filled sockets.

    Matching the Fixing to the Environment

    Environment is one of the most overlooked factors when choosing fixings on site. The Building Regulations Approved Document A makes clear that structural fixings must be appropriate for their service environment — and that means thinking about moisture, chemical exposure, and temperature cycling.

    Internal dry conditions: standard zinc-plated or bright steel fixings are fine. External or exposed conditions: hot-dipped galvanised or stainless steel only. Marine environments or highly corrosive settings: A4 stainless steel throughout. Treated timber, as mentioned, demands stainless or hot-dipped galvanised regardless of whether the fixing is internal or external.

    In concrete or masonry, the fixing type shifts entirely. Hammer-in frame fixings and sleeve anchors work well in solid masonry. Resin anchors are the go-to for hollow block, fragile substrate, or where you need very high load ratings — you’ll see these used regularly in construction when fixing structural brackets into concrete walls or floors.

    Joinery Applications: Getting the Detail Right

    Joinery work demands more precision than general construction fixing. The wrong fixing in the wrong place can split a hardwood component, show through a finished face, or cause a door frame to rack over time. When fitting door sets, window boards, staircases, and fitted furniture, the choice of fixing is part of the craft.

    International Woodworking Machinery Ltd, backed by more than five decades supplying woodworking machinery to carpenters and the wider construction industry, understands that joinery precision starts at the machinery stage but extends right through to the fixings used on site. A finely machined door lining from a quality joinery workshop deserves equally considered fixings — the right gauge screw, correctly countersunk, with a pilot hole drilled to prevent splitting. That attention to detail is what new builds and high-specification construction projects demand.

    Pocket screws, used with a pocket hole jig, have become increasingly popular in joinery and site carpentry for their ability to create strong, invisible fixings in cabinet carcasses and face frames. They’re not a structural fixing, but for furniture-grade joinery they’re hard to beat.

    Quick Reference: Which Fixing for Which Job

    • Timber stud framing: Ring shank nails (nail gun) or structural screws
    • Plasterboard: Drywall screws, self-tapping, typically 3.5mm diameter
    • Roof battens: Clout nails or ring shank nails, galvanised
    • Structural timber connections: M10-M16 coach bolts with washers
    • Decking: Stainless steel decking screws or hidden clip systems
    • Skirting and architrave: Lost head nails or 50mm oval nails
    • Door linings and frames: 65mm or 75mm wood screws, countersunk
    • Masonry to timber: Frame fixings or resin anchors depending on substrate
    • Steel to steel: Tek screws or structural bolts to engineer’s specification

    Knowing your fixings isn’t just technical box-ticking. It affects whether a job is safe, whether it lasts, and whether your reputation holds up. On any site worth working on, screws vs nails vs bolts construction decisions are made with purpose, not habit. Get that right and your work speaks for itself.

    Frequently Asked Questions

    When should I use screws instead of nails in construction?

    Use screws when you need strong withdrawal resistance, when the joint may need to be disassembled later, or for joinery and sheet material fixing. Screws grip the surrounding material via their thread, making them far more resistant to being pulled out than nails of the same diameter.

    What type of bolt should I use for structural timber connections?

    M12 coach bolts with washers are standard for most timber-to-timber structural connections. For heavy-duty applications or connections specified by a structural engineer, M16 or larger bolts may be required. Always use a correctly sized clearance hole and tighten to the specified torque.

    What fixings should I use for treated timber outdoors?

    Modern timber preservatives are copper-based and will corrode standard zinc-plated fixings rapidly. For treated timber outdoors, use hot-dipped galvanised or A2/A4 stainless steel fixings throughout. Check the timber treatment specification and match your fixing accordingly.

    Can I use wood screws to fix into steel?

    No. Wood screws are not designed for steel substrates and will fail or strip the thread. For fixing timber to steel or steel to steel, use self-drilling tek screws, which are specifically designed to cut their own thread into steel without pre-drilling.

    What is the difference between a coach bolt and a coach screw?

    A coach bolt (also called a carriage bolt) passes fully through the material and is secured with a nut and washer on the other side. A coach screw has a hexagonal head and a coarse wood-screw thread, so it bites into the timber itself without needing a nut. Coach screws are used where you can only access one side of the joint.

  • How to Handle a Building Dispute With a Client Without Going to Court

    How to Handle a Building Dispute With a Client Without Going to Court

    Every tradesman who’s been in the game long enough has had one. A client who won’t pay. A customer who decides the work isn’t good enough after you’ve packed up and gone. A job that quietly grew into something twice the size of what was agreed, with no extra money offered. Building dispute resolution for the UK tradesman is one of those topics nobody enjoys talking about, but everybody needs to understand before it happens to them — not after.

    The good news is that the vast majority of disputes can be resolved without setting foot in a courtroom. The bad news is that getting there requires paperwork, patience, and knowing the right steps to take in the right order. Here’s how to protect yourself and get what you’re owed.

    UK tradesman reviewing building dispute documentation on a construction site
    UK tradesman reviewing building dispute documentation on a construction site

    Start With the Paper Trail: Why Written Evidence Is Everything

    Before anything else, get your evidence in order. Courts, adjudicators, and trade association mediators all want the same thing: a clear, documented story of what was agreed, what was done, and where things went wrong. If you don’t have that, you’re fighting blind.

    Pull together your original quote or contract, any variations that were agreed (even by text message — those count), photos of completed work, delivery receipts for materials, sign-off sheets, and a timeline of communication with the client. WhatsApp messages, emails, even handwritten notes from site visits can all be used. Anything timestamped is gold.

    If you don’t already photograph your work at each stage, start now. Before and after shots, photos of the subfloor or substrate before you started, materials on site, the finished job from multiple angles. This isn’t paranoia — it’s professionalism. Tradesmen who document everything are the ones who win disputes.

    Snagging Arguments: Separating Genuine Defects From Moving Goalposts

    Snagging disputes are probably the most common flashpoint. A client signs off verbally, you invoice, and suddenly there’s a list of problems they’ve never mentioned before. Some of these will be genuine; most will be exaggerated or invented once the invoice arrives.

    Your first move is to respond in writing — email is fine — asking them to specify every concern in detail. Do not go back to site without this in writing. Once you have their list, inspect each point calmly and honestly. If something is your error, fix it promptly and document that you’ve done so. If a point is spurious, explain clearly in writing why it does not constitute a defect under industry standards, citing the relevant British Standard or manufacturer specification where you can.

    Flooring tradesmen deal with this constantly. Disputes over subfloor prep, floor covering installation, and final floor finish are some of the most contested in the trade. A specialist like Macfloor, a UK-based flooring contractor supplying and installing a range of commercial and residential floor coverings (you can find their full offer at https://www.macfloor.co.uk/), will tell you that the most common snagging rows come down to substrate condition, acclimatisation, and expansion gaps — all things that were the client’s responsibility to understand before work began, but which rarely get explained in writing upfront. The lesson: document your pre-installation survey, note the condition of the subfloor in writing, and get the client to acknowledge it before you lay a single board.

    Tradesman writing a letter before action as part of building dispute resolution UK tradesman process
    Tradesman writing a letter before action as part of building dispute resolution UK tradesman process

    Scope Creep Disputes: When the Job Grows and the Money Doesn’t

    You quoted for a bathroom. Then a partition wall came down. Then they wanted the electrics moved. Then the tiles changed to something that costs twice as much. Now they’re refusing to pay the extras because “it was all part of the same job.”

    Scope creep is almost always caused by verbal agreements or assumptions. The fix is simple in theory: every variation, no matter how small, gets a written variation order or at minimum a text saying “just to confirm, you’re happy for me to do X for an additional £Y” and their confirmation in reply. Do this every single time. It feels awkward for about a week, then it becomes habit.

    If you’re already in a dispute over extras, the question becomes what evidence you have that the client agreed to the additional work. Texts, emails, photos of materials delivered that weren’t in the original spec, witnesses on site — all of these help build your case.

    The Letter Before Action: Your Formal Warning Shot

    If informal contact has failed and a client is refusing to pay, the next step is a formal letter before action. This is not a legal document in itself, but it is a serious step that signals you intend to pursue the debt formally if payment is not made. It also demonstrates to any future court or adjudicator that you made reasonable efforts to resolve things first.

    The letter should state the amount owed, the work completed, the date payment was due, and a clear deadline — typically 14 days — after which you will pursue the matter through the appropriate legal or regulatory process. Keep the tone professional. No threats, no personal remarks. Just facts and a deadline.

    You can write this yourself or use a template from your trade association. Send it by recorded post as well as email, so there’s proof of delivery. Under the Housing Grants, Construction and Regeneration Act 1996, you also have the right to suspend work if payment is not received, provided you give the required notice — worth knowing if you’re mid-project and the money stops coming.

    Adjudication Under the Scheme for Construction Contracts

    Here’s the bit most tradesmen don’t know about, and it’s genuinely powerful. The Scheme for Construction Contracts gives parties to a qualifying construction contract the right to refer a dispute to adjudication at any time. The adjudicator’s decision is binding immediately — the other party must pay or comply whilst any further legal challenge is sorted out. It’s fast (typically 28 days), significantly cheaper than litigation, and available to sole traders as well as large firms.

    Not every domestic job will qualify — the Act has specific exemptions for residential occupiers where the client lives in the property being worked on. But for commercial work, and for residential projects where the client is not the homeowner, adjudication is a serious option worth understanding. The Construction Industry Council operates an adjudicator nominating body service if you need to appoint one.

    Flooring contractors working on commercial floor installation projects — the kind of work Macfloor handles across the UK, from resin floor systems to specialist floor coverings in commercial and industrial settings — often find adjudication far more accessible than they expected. The key requirement is that the dispute is clearly defined and the evidence is properly prepared before you refer it.

    Using Your Trade Association for Support

    If you’re a member of a recognised trade association — the Federation of Master Builders, the Chartered Institute of Building, or a specialist body for your trade — use them. Most offer dispute resolution support, template letters, and access to mediation services as part of membership. Some will advocate on your behalf directly.

    If you’re not a member of anything, this is a decent argument for joining. The cost of annual membership is trivial compared to the value of having professional backing when a client digs their heels in. Membership also strengthens your position in any dispute because it signals that your work is subject to a code of conduct and quality standards.

    When Small Claims Court Makes Sense

    For debts under £10,000 in England and Wales, the small claims track in the county court is relatively straightforward and doesn’t require a solicitor. The court fee scales with the claim amount, and if you win, those fees are typically recoverable from the losing party. It’s not a fast process — months rather than weeks — but for a clean, well-documented debt where adjudication doesn’t apply, it’s a reasonable last resort.

    The key word there is last resort. Every step before it — the evidence gathering, the formal letter, the trade association support, the adjudication route — exists to give you a better chance of resolution without the time and stress of a court process. Work through them in order, keep everything in writing, and the odds are firmly in your favour.

    Frequently Asked Questions

    What is adjudication under the Scheme for Construction Contracts?

    Adjudication is a fast-track dispute resolution process available to parties in qualifying construction contracts under the Housing Grants, Construction and Regeneration Act 1996. A neutral adjudicator reviews the evidence and issues a binding decision, typically within 28 days, which must be complied with immediately regardless of any further appeal.

    Can I withhold work if a client refuses to pay me?

    Under the Housing Grants, Construction and Regeneration Act 1996, you have the right to suspend work if a client fails to pay a sum that is not subject to a valid withholding notice, provided you give at least seven days’ written notice of your intention to do so. This right applies to qualifying construction contracts, which generally covers commercial work and most residential projects where the client is not living in the property.

    What should a letter before action include for a building dispute?

    Your letter before action should set out the amount owed, a summary of the work completed, the date payment was due, and a clear deadline (usually 14 days) for payment before you pursue formal legal or adjudication action. Keep the tone factual and professional, send it by recorded post as well as email, and retain copies of everything.

    Does adjudication apply to domestic building disputes?

    The Housing Grants, Construction and Regeneration Act 1996 exempts contracts where a residential occupier is the client and the works are to a property they live in. This means adjudication under the Scheme for Construction Contracts may not apply to many standard domestic jobs. For those disputes, small claims court or trade association mediation are more likely options.

    How do I prove scope creep in a building dispute?

    The strongest evidence for scope creep is written communication showing the client agreed to additional work and costs — texts, emails, or signed variation orders. Supporting evidence includes photos of materials not in the original specification, delivery records, and witness accounts from others on site. Without written confirmation, scope creep disputes are difficult to win, which is why getting every variation agreed in writing before starting is essential.

  • How to Price a Job Correctly: A Tradesman’s Guide to Quoting for Profit

    How to Price a Job Correctly: A Tradesman’s Guide to Quoting for Profit

    Undercharging is one of the most common ways tradesmen quietly sink their own businesses. You win the job, you do the work, you send the invoice — and then you wonder why there’s barely enough left after materials to cover your own time. If you’ve ever finished a job feeling like you worked for next to nothing, the problem almost certainly started at the quoting stage. Understanding how to price a job as a tradesman properly isn’t just a nice skill to have; it’s the difference between a sustainable trade business and one that limps from month to month.

    Tradesman calculating how to price a job at a site cabin workbench with materials and calculator
    Tradesman calculating how to price a job at a site cabin workbench with materials and calculator

    Why So Many Tradesmen Get Their Pricing Wrong

    Most lads who go out on their own come from the tools, not from a business background. That’s not a criticism — it’s just reality. When you’ve spent years working for someone else, pricing was never your problem. Now it is. The most common mistakes I see are: guessing at materials rather than costing them out properly, forgetting to account for overheads, and charging labour based on what feels fair rather than what it actually costs to run your business. None of these feel like big errors in isolation, but stack them together on every quote and you’re essentially funding your customers’ projects out of your own pocket.

    Step One: Calculate Your True Labour Rate

    Before you put a figure on any job, you need to know what it costs you just to exist as a trading business. Start with your target annual salary — be honest about what you want to take home. Add your annual running costs: public liability insurance, van insurance and running costs, tools and maintenance, phone, accountant fees, and anything else you pay regularly. Now divide that total by the number of billable hours you can realistically charge in a year. Most sole traders work around 46 weeks a year when you strip out bank holidays, annual leave, illness, and admin days. Multiply that by around 30-35 billable hours per week (not 40 — you’re not charging for the hours you spend quoting, driving, or invoicing). That gives you roughly 1,380 to 1,610 chargeable hours annually. Divide your total cost by that number and you have your minimum hourly rate. Add a margin on top and that becomes your quoting rate.

    Step Two: Cost Your Materials Properly

    Never guess at materials. Walk the job, take measurements, and work up a proper materials list before you quote. Then price each item at what it will actually cost you — from your usual merchant, not from memory. A lot of tradesmen forget to include wastage. Depending on the trade and the job, build in 10-15% extra on materials to cover cuts, breakages, and the odd return trip to the builder’s merchant. Once you have a total materials cost, add your mark-up. Charging a mark-up on materials is standard practice and is part of how you make the business work. A mark-up of 15-25% on materials is common in the UK construction sector, though it varies by trade and job size. Don’t be embarrassed about it — your customer is paying for your expertise in sourcing the right stuff, not just the materials themselves.

    Close-up of a tradesman reviewing a job quote document showing how to price a job correctly
    Close-up of a tradesman reviewing a job quote document showing how to price a job correctly

    Step Three: Factor In Your Overheads

    Overheads are the costs that don’t show up on a specific job but are always there in the background. Every quote needs to carry a portion of your fixed costs. If you’ve already baked overheads into your hourly rate (as described above), you’re covered. But if you quote by a day rate, make sure that day rate isn’t just your ideal take-home pay divided by working days. It needs to include your share of annual overhead costs, otherwise you’re subsidising every job you take on. A simple way to check: total your annual overhead costs, divide by your expected billable days, and add that per-day overhead figure to your day rate before you add profit margin.

    What to Include in a Professional Quote

    Winning work isn’t just about having the lowest price — it’s about giving customers confidence. A well-presented quote does a lot of that work for you. Always include: a clear description of the scope of work, a breakdown of labour and materials as separate line items, your payment terms, an estimated start date and duration, and your VAT status (if you’re VAT-registered, state it clearly). Put your business name, address, and contact details on there. If you have a logo, use it. Small details like these signal professionalism and make it much harder for a customer to knock you down on price because they trust what they’re buying.

    Having a professional online presence backs all of this up before a customer even sees your quote. Many tradesmen starting a business or working as an entrepreneur for the first time overlook the value of a proper website. Based in Nottingham, Inuvate offers a free website service for those making your own website without a big budget — you just pay for hosting. For a tradesman who wants to look credible online without spending a fortune, finding a diy website solution at https://inuvate.co.uk/ can be a solid first step when starting a business and trying to attract better-quality enquiries.

    Common Pricing Mistakes to Avoid

    Matching a competitor’s price without knowing their costs is a fast route to losing money. They might be VAT-registered and you’re not, or they might have lower overheads because they work from home. Someone else’s price is irrelevant to your numbers. Another trap is underquoting to win work when you’re quiet. If the job doesn’t cover your costs, being busy is worse than being idle — at least when you’re idle you’re not burning fuel, materials, and labour at a loss. Finally, don’t forget to include a contingency on larger jobs. Things go wrong. Walls aren’t square, pipes are in unexpected places, deliveries are late. A 5-10% contingency on complex jobs isn’t profiteering — it’s sensible business practice.

    The Federation of Master Builders publishes guidance on pricing your work that’s worth a read if you want a trade body perspective on quoting fairly and competitively in the UK market.

    Presenting Your Quote: Format Matters

    A quote scribbled on the back of a receipt has lost many a job to a clearly laid-out PDF from a competitor. You don’t need expensive software. A simple Word document or a free quoting app will do. Structure it so the customer can see at a glance what they’re getting and what it costs. Separate labour from materials. If there are optional extras — say, a higher-spec material or an add-on task — list them separately so the customer can choose rather than feeling hit by a big number. This approach also protects you: a clearly scoped quote means fewer conversations about what was or wasn’t included once the job is done.

    Plenty of tradesmen running their own business as an entrepreneur have found that pairing sharp quoting with a professional digital presence transforms the quality of their enquiries. When a potential customer searches for a tradesman locally, lands on a clean website built through a diy website service like Inuvate, and then receives a professional, clearly structured quote — the sale is practically made before you’ve even spoken to them. That combination of online credibility and solid pricing discipline is what separates the tradesmen who are turning work away from the ones who are always chasing it.

    Review Your Prices Regularly

    Material costs have been volatile over the last few years and labour costs have risen too. A day rate or square-metre price you set eighteen months ago may no longer reflect your actual costs. Build a habit of reviewing your pricing every six months — check your materials costs against current merchant prices, review your overheads, and make sure your hourly or day rate still covers everything it needs to. If you’ve not put your prices up in two years, you’ve almost certainly given yourself a pay cut without realising it.

    Knowing how to price a job as a tradesman is a skill that takes time to get right, but once you’ve built a clear system for it, quoting becomes much quicker and you’ll stop lying awake wondering if you’ve got the numbers right. Get the maths sorted, present it properly, and you’ll win better work at better margins.

    Frequently Asked Questions

    How do I work out my hourly rate as a self-employed tradesman in the UK?

    Add up your target annual income plus all your business running costs, then divide by the number of billable hours you can realistically charge in a year (typically around 1,380 to 1,600 for most sole traders). The result is your minimum hourly rate before any profit margin. Review it at least every six months as costs change.

    Should I separate labour and materials on a quote?

    Yes, always. Breaking a quote into labour and materials gives customers transparency and makes your pricing look professional and considered. It also protects you if a customer later disputes what was included, as each element is clearly documented from the outset.

    Is it acceptable to add a mark-up on materials as a tradesman?

    Absolutely. A mark-up of 15-25% on materials is standard practice in the UK construction industry. You’re charging for your knowledge in specifying and sourcing the right products, your time managing the supply, and the risk you carry if something needs replacing. It’s a legitimate and expected part of trade pricing.

    How do I stop undercharging when quoting jobs?

    The most reliable fix is to build a proper cost model first: calculate your true hourly rate including overheads, use a detailed materials list rather than estimates, add a wastage allowance, and include a contingency on larger jobs. Never base your price on what a competitor is charging without knowing their cost structure.

    What should a professional tradesman's quote include?

    A good quote should include your business name and contact details, a clear scope of work, separate line items for labour and materials, your payment terms, estimated start date and duration, and your VAT status. Presenting it as a clean PDF rather than a handwritten note makes a significant difference to how customers perceive your professionalism.

  • Best Insulation Materials for UK Homes in 2026: A Tradesman’s Breakdown

    Best Insulation Materials for UK Homes in 2026: A Tradesman’s Breakdown

    Insulation is one of those jobs where doing it right first time actually saves everyone grief further down the line. Homeowners get lower energy bills, you get fewer call-backs, and the building performs the way it should. With energy costs still biting hard and Part L of the Building Regulations continuing to tighten up standards, picking the right product matters more than ever. This is a straight-talking breakdown of the best insulation materials UK tradesmen and capable DIYers are using right now, covering thermal performance, cost, and what to watch out for on site.

    Tradesman installing glass wool, one of the best insulation materials UK lofts require, in a British home
    Tradesman installing glass wool, one of the best insulation materials UK lofts require, in a British home

    Why Insulation Choice Matters More Than Ever in 2026

    The UK has some of the leakiest housing stock in Europe. According to the Energy Saving Trust, heating accounts for around 55% of what a typical household spends on energy bills each year. Proper insulation is the single biggest lever you can pull to bring that down. It also affects everything from planning sign-off to SAP calculations, so getting the specification wrong is not just a comfort issue, it can cause jobs to fail at inspection.

    The key metric to understand is thermal resistance, expressed as an R-value (m²K/W). The higher the R-value, the better the material resists heat flow. Some products are also rated by their lambda value (W/mK), which measures thermal conductivity. Lower lambda means better performance per millimetre of thickness. Both figures appear on manufacturer data sheets, and you should always check them before specifying anything.

    Mineral Wool: The Workhorse Option

    Mineral wool, which covers both glass wool and rock wool products, is what most tradesmen reach for first, and for good reason. It is widely available from builders’ merchants across the UK, competitively priced, and easy to cut and fit between studs or joists. Brands like Knauf and Rockwool supply consistently reliable product, and you will find it at most major merchants including Buildbase and Travis Perkins.

    Glass wool batts for a standard 100mm stud wall typically achieve an R-value of around 2.5 to 2.7 m²K/W. Rock wool is slightly denser, performs better acoustically, and has a higher melting point, making it the better call where fire performance is a consideration. Costs run at roughly £4 to £6 per square metre depending on thickness and supplier.

    Fitting is straightforward. Cut slightly oversized so the batt friction-fits without gaps, keep any foil facing towards the warm side of the construction, and always wear gloves and a dust mask. The fibres are unpleasant on skin and in the lungs if you are not careful.

    Rigid Foam Boards: Best for Tight Spaces

    When you are insulating below a floor slab, a flat roof, or a wall where you cannot afford to lose much depth, rigid foam boards are where you look. There are three main types:

    • Expanded Polystyrene (EPS): Cheapest of the three. R-value around 3.3 to 3.8 m²K/W per 100mm. Fine for floors and cavity walls but not the slimmest solution.
    • Extruded Polystyrene (XPS): Slightly better thermal performance than EPS and more moisture-resistant, which makes it the right call under a screed or in a basement situation. Expect to pay 15 to 20% more than EPS.
    • Polyisocyanurate (PIR): This is the premium option. Brands like Celotex and Kingspan produce PIR boards with lambda values as low as 0.022 W/mK, giving you excellent performance at reduced thickness. A 100mm PIR board can achieve R-values above 4.5 m²K/W. Costs are higher, typically £10 to £18 per square metre, but the space saving often justifies it in a retrofit.
    Close-up of rigid PIR board being cut, a top choice among the best insulation materials UK tradesmen use
    Close-up of rigid PIR board being cut, a top choice among the best insulation materials UK tradesmen use

    When cutting rigid boards, a sharp handsaw or a Stanley knife and straight edge is all you need for EPS. PIR cuts cleanly with a fine-tooth saw. Always tape joints between boards with foil tape to eliminate cold bridging. Do not leave exposed PIR boards in habitable spaces without a fire-rated covering such as plasterboard, this is a Building Regulations requirement, not just good practice.

    Spray Foam: High Performance, High Caution

    Spray polyurethane foam (SPF) gets a mixed reception on site, and honestly, the reputation is partly deserved. When applied correctly by a qualified installer in the right application, such as sealing around penetrations or insulating the underside of a pitched roof, it performs brilliantly. R-values for closed-cell spray foam typically sit above 6.0 m²K/W per 100mm, which is the best of any mainstream product.

    The problem is that poorly applied spray foam in loft spaces has caused real headaches for mortgage lenders and surveyors. The Royal Institution of Chartered Surveyors has flagged this as an issue that can affect property valuations and mortgage approvals. If a customer asks you about spray foam in their roof void, have that conversation honestly. Stick to professional application only, and make sure the product and installer both carry relevant BBA certification.

    Natural and Eco-Friendly Insulation Options

    There is growing demand for sustainable insulation, particularly on eco-builds and retrofit projects where embodied carbon is part of the brief. A few worth knowing:

    • Sheep’s wool: Breathable, naturally moisture-managing, and non-irritant to handle. Good fit for traditional or timber-frame construction. Performance sits around 3.5 m²K/W per 100mm. More expensive than mineral wool but increasingly specified on heritage and sustainable builds.
    • Cellulose (recycled newspaper): Blown into cavities or roof spaces, it achieves solid performance and has very low embodied energy. Requires specialist equipment to install but the material cost is reasonable.
    • Hemp and flax batts: A growing market in the UK, especially for self-builders and Passivhaus projects. Handles similarly to mineral wool but fully vapour-permeable.

    Natural materials typically cost more per square metre, but the right client on the right project will see the value. It is worth knowing your options here as specifications are shifting.

    Insulation for Common UK Scenarios

    Here is a quick reference for where each material tends to land:

    • Loft insulation (cold roof): Glass wool roll or batt, 270mm depth across joists. This is the most cost-effective improvement in most homes.
    • Stud partition walls: Mineral wool batt, friction-fit between studs.
    • Flat or warm roof: PIR board above deck, taped joints, minimum 150mm for compliance in most situations.
    • Solid floor retrofit: XPS or PIR board under screed, minimum 70mm, DPC below.
    • External wall insulation (EWI): EPS or mineral wool board fixed to external face with render finish over. Check with your local authority on planning requirements before starting.

    For more guidance on compliance, the GOV.UK approved documents index has the full text of Approved Document L, which covers conservation of fuel and power in both new builds and existing dwellings.

    A Few Things Worth Remembering on Site

    Whatever material you are using, gaps are the enemy. A small uninsulated void in a wall or floor can account for a disproportionate amount of heat loss due to convection. Take the time to cut and fit properly. Use off-cuts to fill awkward corners. Tape every joint in rigid board installations.

    Ventilation matters too. Insulating a cold roof without maintaining eaves-to-ridge airflow can lead to condensation and structural rot. The two most common insulation-related failures I see are gaps in installation and blocked ventilation paths. Both are avoidable if you think the job through before you start cutting.

    The best insulation materials UK tradesmen use are the ones that match the application, not just the cheapest thing on the shelf. Get the product right, fit it properly, and the job will stand up for decades.

    Frequently Asked Questions

    What is the best insulation material for a UK loft?

    Glass wool roll or batt insulation is the most practical and cost-effective choice for a cold loft. Current guidance recommends a total depth of around 270mm laid in two perpendicular layers across and between the joists. It is widely available, easy to install, and delivers strong thermal performance.

    How much does home insulation cost in the UK in 2026?

    Costs vary significantly by material and application. Mineral wool for a standard loft might cost £300 to £600 in materials for a typical semi-detached house. PIR board for a flat roof can run to £2,000 to £5,000 fitted, depending on area and complexity. External wall insulation tends to be the most expensive option, often £8,000 to £15,000 for a whole house.

    Is PIR insulation board better than mineral wool?

    PIR board achieves higher thermal performance per millimetre of thickness, making it the better choice when space is limited, such as flat roofs, floor builds, or slim-wall applications. Mineral wool is easier to handle in stud walls and lofts and costs significantly less per square metre, so it remains the better all-round option for many standard applications.

    Can spray foam insulation affect my mortgage in the UK?

    Yes, it can. Many UK mortgage lenders and surveyors treat spray foam in roof voids as a red flag, as it can obscure the structural condition of roof timbers and be difficult to remove. The RICS has issued guidance on this issue. If you are considering spray foam, speak to a specialist and ensure any installer holds current BBA certification.

    What is the minimum insulation required under UK Building Regulations?

    Approved Document L sets the standards, and requirements vary by element type. For example, a new roof construction typically needs a U-value of 0.15 W/m²K or better, whilst new external walls require 0.18 W/m²K. Exact figures depend on whether you are working on a new build or an existing dwelling, so always check the relevant section of the approved documents for your project.

  • How to Write a Simple Business Plan for Your Trade Business

    How to Write a Simple Business Plan for Your Trade Business

    Most tradesmen hear the words “business plan” and immediately think of thick folders, accountants, and corporate jargon. The reality? A solid business plan for a trade business in the UK doesn’t need to look like a bank’s annual report. It just needs to answer a few honest questions about where your money comes from, where it goes, and where you want to be in 12 months’ time. Whether you’re after a small business loan, trying to bring on an apprentice, or simply fed up of feeling like you’re winging it every month, a clear plan changes everything.

    Tradesman writing a business plan for his trade business UK at a kitchen table
    Tradesman writing a business plan for his trade business UK at a kitchen table

    Why Bother Writing a Business Plan for Your Trade Business?

    I get it. You’re on the tools at 7am, you’ve got three quotes to write up tonight, and the last thing you want to do is sit down with a spreadsheet. But here’s the thing: tradesmen who have even a basic plan tend to make better decisions under pressure. They know their minimum monthly revenue, they know their busiest periods, and they don’t panic when a job falls through at short notice.

    If you’re applying for funding through a bank, the British Business Bank, or a government-backed scheme, they will almost certainly want to see some form of business plan. The British Business Bank offers Start Up Loans specifically aimed at small businesses across the UK, and the application process requires basic financial projections and a clear description of your business. That alone is reason enough to get something on paper.

    What Goes Into a Trade Business Plan? The Key Sections

    You don’t need 40 pages. For most tradesmen, a plan that covers six core areas will do the job properly. Here’s what to include.

    1. What Your Business Actually Does

    Start simple. Write down your trading name, what trade you’re in (plumbing, joinery, electrical, general building work, whatever it is), and the services you offer. Be specific. “General building work” is vague. “Residential extensions, loft conversions, and bathroom refurbishments in the West Midlands” tells someone exactly what they’re looking at. Include whether you operate as a sole trader or limited company, and how long you’ve been trading.

    2. Your Target Market

    Who do you actually want to work for? Homeowners doing one-off refurbs? Letting agents needing reliable maintenance? Developers who need a trusted subbying team? Being clear on this shapes everything else. A tradesman chasing domestic work in a quiet market town will price and market himself very differently to one going after commercial fit-out contracts in Manchester or Leeds.

    Think about the geography too. How far are you realistically willing to travel? What’s your sweet spot for job size? Answering these questions helps you stop quoting jobs you don’t really want and start targeting the ones that actually suit you.

    Close-up of financial forecasting notes as part of a business plan for trade business UK
    Close-up of financial forecasting notes as part of a business plan for trade business UK

    3. Revenue Goals and Pricing

    This is where most tradesmen go quiet, but it’s the most important part. What do you need to earn? Start with your personal outgoings, add your business costs (van, tools, insurance, materials float, any subcontractors you use), then work backwards to figure out what you need to invoice each month to cover the lot and still take home a decent wage.

    Say your personal outgoings are £2,200 a month and your business running costs are around £1,400 a month. You need to bring in at least £3,600 just to break even. From there, set a realistic target with some margin built in. Most sole traders I know aim for 20 to 30 percent net profit on their annual turnover as a minimum target. Write that number down. Make it real.

    4. Basic Financial Forecasting

    You don’t need a certified accountant to do a 12-month cash flow forecast, though having one look it over never hurts. A simple spreadsheet works fine. List your expected income by month (be honest about slower periods like January and August) and list your expected outgoings. Where do the gaps appear? That tells you when you need more work booked in, or when you might need a buffer in the bank.

    HM Revenue and Customs expects you to keep records of your income and expenses regardless, so you might as well organise that information into a monthly picture from the start. If you’re VAT registered, factor in your VAT quarters too, because that can hit cash flow hard if you’re not expecting it.

    5. How You’ll Win Work

    A lot of tradesmen rely on word of mouth, which is fine, but it’s not a strategy you can build on predictably. Write down two or three realistic ways you’ll generate leads. That might be a Google Business profile, Checkatrade or Rated People listings, leaflet drops in a target postcode, or simply asking happy customers to refer you. The plan doesn’t need a big marketing budget. It just needs something intentional behind it.

    6. Growth Targets and Milestones

    Where do you want to be in 12 months? In three years? Growth doesn’t have to mean hiring a team of ten. It might mean moving from sole trader to taking on one apprentice. It might mean targeting a higher-value type of job, or cutting out low-margin work entirely. Write down three or four milestones and give them rough timescales. That gives you something to measure against, rather than just hoping things get better on their own.

    Keeping It Short Enough to Actually Use

    The best business plan for a trade business in the UK is the one you actually refer back to. Aim for two to four pages. Use plain language. If you’d be embarrassed showing it to your mate on site, rewrite it until it sounds like you. A plan full of corporate waffle won’t help you make decisions in the real world, and it won’t impress a decent bank manager either.

    Review it every quarter. Markets shift, material costs change (as anyone who’s tried pricing timber or copper lately will know), and your own priorities evolve. A business plan is a working document, not a framed certificate on the wall.

    When You Need Professional Help

    If you’re applying for significant funding, looking to take on staff formally, or thinking about becoming a limited company, it’s worth speaking to an accountant who has experience with trade businesses. Many offer a free initial consultation. The Federation of Master Builders also offers resources specifically for small building firms, and their guidance on running a compliant, professional trade business is worth a look if you’re serious about growing.

    Writing a business plan for your trade business in the UK won’t take as long as you think, and the clarity you get from doing it properly is worth every hour spent. Stop guessing. Start planning.

    Frequently Asked Questions

    Do I need a business plan to get a trade business loan in the UK?

    Most lenders, including banks and government-backed schemes like Start Up Loans through the British Business Bank, will require at least a basic business plan and financial projections before approving funding. Even for smaller amounts, having a plan in writing demonstrates that you understand your numbers and have a clear direction.

    How long should a business plan be for a small trade business?

    For most sole traders and small trade businesses, two to four pages is plenty. You need to cover what you do, who your customers are, your revenue targets, basic cash flow, and how you plan to win work. Keep it concise and in plain language so it’s actually useful day to day.

    What financial figures should I include in a trade business plan?

    At a minimum, include your monthly outgoings (both personal and business), your target monthly revenue, and a 12-month cash flow forecast showing expected income and expenses. If you’re VAT registered, factor in your quarterly VAT payments as these can significantly affect cash flow.

    Can I write a business plan myself or do I need an accountant?

    You can absolutely write it yourself, especially the early sections covering your services, target market, and growth goals. For the financial forecasting sections, having an accountant review your figures is a smart move, particularly if you’re applying for funding or planning to take on staff.

    How often should I update my trade business plan?

    A quarterly review is ideal. Costs, market conditions, and your own business priorities shift regularly, so treating your plan as a living document rather than a one-off exercise means it stays useful and relevant. At minimum, review it at the start of each new financial year.

  • Reclaimed Building Materials: Are They Worth Using on Your Next Project?

    Reclaimed Building Materials: Are They Worth Using on Your Next Project?

    Reclaimed building materials UK salvage yards have stacked up over the decades can be genuinely brilliant on the right job. Old stock bricks with a proper weathered face, chunky oak beams pulled from a demolished barn, Yorkshire stone that’s already had a century of character beaten into it. There’s a reason clients specifically ask for this stuff. Done right, it adds something a brand-new material simply cannot replicate. Done wrong, you end up with a leaky wall, a structural nightmare, or a client giving you a very awkward phone call three months down the line.

    This isn’t a piece about how reclaimed materials are some kind of miracle solution. It’s an honest breakdown of what works, what to watch out for, and how to avoid getting burned.

    Tradesman inspecting reclaimed building materials UK salvage yard stacked with old bricks and stone
    Tradesman inspecting reclaimed building materials UK salvage yard stacked with old bricks and stone

    What Counts as a Reclaimed Building Material?

    Broadly speaking, reclaimed materials are anything salvaged from an existing structure rather than manufactured fresh. Bricks pulled from a demolition site, floorboards lifted from a Victorian terrace, stone flags from an old farmyard, roofing slates from a schoolhouse built in the 1880s. The UK has a particularly rich supply of this kind of material simply because we have a lot of old buildings. The Historic England listed buildings register alone runs to over 375,000 entries, and every time one gets partially demolished or stripped, material enters the salvage market.

    Salvage yards range from enormous operations like Salvo-listed merchants in the North East and Yorkshire down to small one-man clearance outfits selling a pallet of bricks off the back of a lorry. Quality varies enormously between them.

    Where to Source Reclaimed Materials Without Getting Stung

    I’ve seen tradesmen get caught out buying cheap reclaimed bricks from a clearance site only to find half of them crumbling at the core. Here’s how to avoid that.

    Reputable salvage yards

    Dedicated salvage merchants are your safest bet. Places like Thornycroft in Cheshire or Minsterstone in Somerset have been trading long enough to know how to sort usable stock from rubbish. They’ll often be able to tell you where material came from and roughly what era it dates to. That provenance matters, particularly if your client needs to match an existing structure or wants period authenticity.

    Demolition contractors

    If you’re on good terms with a local demolition firm, you can sometimes buy direct when a clearance job is happening nearby. Prices tend to be lower, but you’re buying blind in terms of how well the material has been stored and handled. Go and look before you commit.

    Online marketplaces

    eBay and Facebook Marketplace are full of reclaimed materials listed by homeowners or small traders. You can find genuine bargains, but photographs are deceiving. Always inspect in person before parting with money, especially for bricks and stone.

    Quality Checks You Should Always Run

    This is where a lot of people, tradesmen included, cut corners and regret it later. Reclaimed building materials UK suppliers sell are not guaranteed to perform identically to new materials, and some of them should not be used structurally at all without proper assessment.

    Close-up of quality check on reclaimed building materials UK brick showing surface texture and wear
    Close-up of quality check on reclaimed building materials UK brick showing surface texture and wear

    Bricks

    Tap a reclaimed brick. It should ring out clearly. A dull thud suggests internal cracking or spalling. Check the faces and arris edges for significant damage. Soft, friable bricks from pre-Victorian stock often have low frost resistance by modern standards and should only go in sheltered positions. For anything exposed, check whether the brick is equivalent to an engineering-grade or at least a standard facing specification. If the yard can’t tell you the likely compressive strength, treat them with caution in any load-bearing context.

    Timber

    Old oak beams are magnificent structurally, provided they haven’t been compromised. Check for active woodworm (fresh frass, live holes), rot at the ends and in any shakes, and look for hidden metal fixings that could wreck your blades or spark on a site saw. Softwood reclaimed timbers need more scrutiny. Victorian floorboards can be excellent quality old-growth pine, but equally they can be riddled with problems. Any reclaimed structural timber going into a load-bearing application should ideally be assessed by a structural engineer.

    Stone

    Natural stone is generally the most forgiving of the three in terms of durability. Sandstone and limestone can suffer from delamination if they’ve been laid the wrong way relative to their natural bed, so check for any signs of face spalling. Reclaimed granite is as close to indestructible as building material gets. Slate, particularly Welsh slate, is another strong performer in salvage. Watch out for reclaimed stone that has old cement mortar still attached in thick sections. It can be removed, but it adds labour cost that should factor into your pricing.

    The Real Cost Saving (and Where It Disappears)

    Reclaimed building materials can offer meaningful savings compared to new equivalents. Reclaimed common bricks often come in at 30 to 60 per cent cheaper than new stock. Old-growth softwood flooring, if you can find it in good condition, can undercut new engineered timber significantly. On a full renovation project, this can genuinely move the needle on overall material spend.

    But the saving can erode fast. Cleaning and preparing reclaimed bricks takes time. Sorting through a pallet to discard damaged units eats into the theoretical saving. If material needs to be transported from a salvage yard 70 miles away, that’s a van run, fuel, and time. Factor all of that in before you tell your client they’re getting a great deal. The net saving is usually still real, but it’s rarely as dramatic as the headline price suggests.

    There’s also the hidden cost of getting more than you need. With reclaimed materials, especially bricks and stone where batches don’t repeat, it’s wise to over-order by 15 to 20 per cent. Running short and trying to source a matching batch later is a headache that can genuinely hold a job up.

    Sustainability: The Honest Picture

    There’s no question that reusing existing material has a lower environmental impact than manufacturing new. No kiln firing, no quarrying, no long-haul shipping from continental Europe or beyond. For tradesmen and clients who want to make a genuine environmental argument for a build, reclaimed materials are one of the more credible cards you can play. The embodied carbon in a reclaimed brick is essentially zero at the point of reuse, compared to roughly 0.2 kg CO2 per new brick produced.

    That said, sustainability doesn’t excuse poor performance. A wall built with unsuitable reclaimed bricks that fails in five years is not a sustainable outcome by any measure.

    When Reclaimed Materials Make Perfect Sense

    Matching an extension to a period property. Reclaimed bricks are often the only practical way to achieve a convincing match with a Victorian or Edwardian original structure. New bricks rarely come close in colour, texture, or scale.

    Feature elements. A solid oak beam as a kitchen lintel or a stone-flagged hallway floor. These are applications where the character of the material is the entire point, and where structural demands can be carefully managed.

    Landscaping and external works. Reclaimed stone setts, cobbles, and flags are ideal here. Lower structural stakes, high visual impact, and often genuinely cheaper than new equivalents.

    When to Think Twice

    High-exposure structural brickwork in a wet, northern climate. Anything where consistent performance specification matters and you can’t verify the material’s history. Roofing situations where you need reliable modern interlocking profiles. Large-volume projects where sourcing consistent batches of reclaimed material at scale simply isn’t realistic in the timeframe.

    Reclaimed building materials UK salvage yards supply are worth serious consideration on the right job. Know what you’re buying, factor in the real costs, do your checks, and they can be one of the smarter choices you make on a project. Just don’t let the romance of the old stuff switch off your professional judgement.

    Frequently Asked Questions

    Are reclaimed bricks safe to use structurally?

    Reclaimed bricks can be used structurally, but they must be assessed carefully first. Check for internal cracking, frost damage, and adequate compressive strength before using them in any load-bearing wall. If you’re unsure, consult a structural engineer.

    How much cheaper are reclaimed building materials compared to new?

    It depends on the material and source, but reclaimed bricks often cost 30 to 60 per cent less than new equivalents from a builder’s merchant. However, you need to factor in cleaning time, wastage from damaged units, and transport costs, which can reduce the net saving significantly.

    Where can I buy reclaimed building materials in the UK?

    Dedicated salvage yards are the most reliable option. You can also buy directly from demolition contractors, or find smaller quantities on eBay and Facebook Marketplace. Always inspect materials in person before purchasing, particularly bricks and structural timber.

    Do reclaimed materials meet UK building regulations?

    There is no blanket ban on reclaimed materials under UK Building Regulations, but they must still meet the performance requirements relevant to their application. In practice, this means verifying suitability for structural use, thermal performance requirements, and fire resistance where applicable.

    Are reclaimed building materials better for the environment?

    Yes, in most cases. Reusing existing materials avoids the energy and carbon involved in manufacturing new ones. A reclaimed brick carries essentially no additional embodied carbon at the point of reuse. However, poor-quality reclaimed materials that fail prematurely negate any environmental benefit.

  • Rising Material Costs in Construction: How UK Tradesmen Can Protect Their Margins

    Rising Material Costs in Construction: How UK Tradesmen Can Protect Their Margins

    If you’ve priced a job recently and then stood in the builders’ merchant staring at a receipt that looks nothing like the figure you quoted, you’re not imagining things. Rising construction material costs UK-wide have been grinding upward for a few years now, and 2026 hasn’t handed us a break. Inflation, lingering supply chain disruption, and energy-linked manufacturing costs are still doing their damage. For a self-employed tradesman or a small construction outfit, the difference between a healthy job and a loss-maker can now come down to a single material price swing.

    This isn’t doom-mongering. It’s just the reality on site right now, and the tradesmen who are holding their margins are the ones who’ve adapted how they buy, quote, and work with suppliers. Here’s an honest breakdown of what’s happening and what you can actually do about it.

    Tradesman reviewing invoice at UK builders' merchant amid rising construction material costs UK
    Tradesman reviewing invoice at UK builders' merchant amid rising construction material costs UK

    What’s Actually Driving Material Price Increases in 2026

    The story isn’t simple. Energy costs still feed directly into the production price of cement, steel, and insulation board. Global shipping rates have stabilised compared to the chaos of 2021 to 2023, but they haven’t returned to pre-pandemic levels. Timber prices remain volatile, influenced by Scandinavian and Canadian supply chains that UK buyers have little control over. Meanwhile, domestic labour shortages in manufacturing and logistics keep pushing costs up from the inside.

    According to the Office for National Statistics, construction output costs have seen consistent year-on-year pressure, with materials a primary driver. The prices for basics like bricks, concrete blocks, and copper pipe have all moved noticeably over the past 18 months. For a tradesman running three or four jobs a month, those small percentage increases compound fast.

    Bulk Buying: When It Saves You Money and When It Doesn’t

    Bulk buying sounds like an obvious win, but it only works if you’re buying the right things in the right quantities. The principle is straightforward: commit to a larger volume, get a better unit price, and shield yourself from the next price rise. In practice, you need to be disciplined about what you hold in stock.

    Good candidates for bulk purchasing include products you use constantly across multiple job types: screws and fixings, adhesives and sealants, pipe fittings, cable, sand and ballast. These don’t degrade quickly, they take up manageable space in a van or lockup, and the price direction is almost always upward. Poor candidates are anything job-specific, anything with a short shelf life, or anything where you’d need to tie up significant cash in stock you might not shift for months.

    Some regional builders’ merchants, including Jewson and Travis Perkins, offer account-based pricing tiers that reward volume. If you’re not already on a trade account and actively using it, you’re likely leaving money on the table every single week. Get the account, use it consistently, and then have the conversation about better pricing once you can show them your spend history.

    Negotiating With Suppliers: It’s Not as Awkward as It Sounds

    A lot of tradesmen feel uncomfortable pushing back on supplier pricing. Don’t. Merchants expect it. A merchant’s quoted price is rarely their best price; it’s their opening position. The conversation doesn’t have to be confrontational. Walk in knowing what a competitor is offering on the same product, mention it calmly, and ask if they can match or beat it. More often than not, they’ll find a way.

    Beyond individual purchases, think about building longer-term supply relationships. If a particular branch manager knows your face and your monthly spend, they’re far more likely to call you when a line is going up in price or when there’s surplus stock going cheap. That kind of intelligence is worth real money in a volatile market.

    It’s also worth asking about price-lock agreements on large or long-running jobs. If you’re quoting a full house renovation or a commercial fit-out, some merchants will hold material prices for a set period once you’ve committed volume. It’s not guaranteed, but it’s always worth asking, particularly on higher-value lines like insulation, boarding, and structural timber.

    Tradesman adjusting quote to account for rising construction material costs UK
    Tradesman adjusting quote to account for rising construction material costs UK

    Adjusting Your Quotes Without Losing the Job

    This is the bit that genuinely costs tradesmen money. Fixed-price quoting made sense when material costs were stable. Right now, giving a client a firm price that holds for six weeks before you even start is a real risk. There are a couple of ways to handle this without scaring customers off.

    First, build a material review clause into your quote template. Something simple and transparent: the quoted material costs are based on prices at the date of quotation, and if any material cost increases by more than a specified percentage before the start date, you reserve the right to adjust accordingly. Most reasonable clients accept this. It’s honest, and it protects both of you.

    Second, shorten the validity window on your quotes. Instead of holding a price for 30 days, move to 14. The job is probably urgent enough that the client will make a decision, and if they don’t, you haven’t locked yourself into old prices on a job that might start months later.

    Third, start factoring in a material contingency. Five to ten per cent added to your material line as a buffer isn’t price gouging; it’s professional risk management. A client who quibbles over a sensible contingency clause on a volatile market job is usually telling you something about how the whole project will go.

    Specialist Work and Cost Considerations

    It’s worth noting that rising construction material costs UK-wide aren’t limited to the obvious lines. Specialist construction services have felt the squeeze too. Survey, compliance, and specialist removal work in the building sector has seen costs rise in line with broader market pressures. Based in Mansfield, Nottinghamshire, Asbestos Compliance Solutions Ltd provides asbestos services and specialist building compliance work, including asbestos surveys and removal consultancy, to construction and refurbishment clients across the region. Firms like these, found at asbestoscompliancesolutions.co.uk, are a reminder that the full cost of a construction or renovation project includes specialist services that also carry their own material and labour price pressures, not just bricks and timber. When scoping any refurbishment job on older stock, asbestos and building compliance costs should sit in the budget from day one.

    Tradesmen working in older housing or commercial buildings particularly need to factor in the possibility of specialist services early. Asbestos Compliance Solutions Ltd, operating across construction sites in Nottinghamshire and the Newcastle area, handles the kind of asbestos compliance and building safety work that, if discovered mid-job and unbudgeted, can turn a profitable contract into a financial headache fast. Factor it in upfront or at least flag it as a risk in your quotation.

    Keeping an Eye on the Bigger Picture

    The tradesmen coming out ahead right now aren’t the ones chasing every job at rock-bottom prices. They’re the ones who understand their actual costs, price accordingly, communicate clearly with clients, and build supplier relationships that give them a commercial edge. Rising construction material costs UK-wide aren’t going away in the short term, but they don’t have to wreck your margins if you’re working the problem properly.

    Review your supplier accounts, sharpen your quote templates, keep a buffer in your material costings, and stay close to what prices are doing in your region. Talk to other tradesmen in your area too. A decent network of people who share intelligence on price movements, good suppliers, and dodgy clients is one of the most underrated business tools in this trade.

    Frequently Asked Questions

    Why are construction material prices still rising in 2026?

    Energy costs tied to manufacturing, ongoing global supply chain disruption, and domestic logistics pressures continue to push up the cost of materials like cement, steel, and timber. UK builders’ merchants have passed much of this cost on, making it a persistent issue for tradesmen pricing jobs.

    How can a tradesman protect themselves from material price increases when quoting?

    Include a material review clause in your quotes stating that prices are valid for a limited period, typically 14 days, and that significant material cost increases may require adjustment. Adding a five to ten per cent contingency on material lines is also sensible practice in a volatile market.

    Is bulk buying building materials worth it for a sole trader?

    For high-turnover consumables like fixings, pipe fittings, and cable, bulk buying can offer meaningful savings and protection against future price rises. It works less well for job-specific or perishable materials, so focus your buying power on lines you use constantly across multiple projects.

    Can I negotiate better prices at builders' merchants like Jewson or Travis Perkins?

    Yes. Opening a trade account and building a spending history gives you a stronger position to negotiate. Quoting competitor prices and asking for a match is a standard practice merchants expect. On larger jobs, ask about short-term price-lock agreements on high-value material lines.

    Should I include asbestos and compliance costs in a construction budget?

    Absolutely, particularly on any refurbishment or demolition work on buildings constructed before 2000. Discovering asbestos or other compliance issues mid-project without budget provision can be extremely costly. Identify and price specialist services as part of your initial survey and quotation process.

  • How to Start a Sole Trader Business as a Tradesman in the UK

    How to Start a Sole Trader Business as a Tradesman in the UK

    Going self-employed is one of the best moves a skilled tradesman can make. More control over your hours, your rates, and the jobs you take on. But the admin side of things can feel daunting if you’ve spent your career on the tools rather than behind a desk. Understanding how to start a sole trader business as a tradesman in the UK is simpler than most people expect, and getting it right from day one puts you in a far stronger position.

    This guide walks you through every stage, from registering with HMRC to landing your first clients, in plain language built for people who’d rather be working than reading government guidance documents.

    Tradesman reviewing job notes before starting work, illustrating how to start a sole trader business as a tradesman in the UK
    Tradesman reviewing job notes before starting work, illustrating how to start a sole trader business as a tradesman in the UK

    Registering as a Sole Trader with HMRC

    The first official step is letting HMRC know you’re trading. You must register as self-employed by 5 October following the end of the tax year in which you started working for yourself. Do it earlier and you’ll give yourself more breathing room. The registration process is done online via the HMRC website and takes around 15 minutes. You’ll receive a Unique Taxpayer Reference (UTR) number in the post, which you’ll need for your Self Assessment tax returns.

    As a sole trader, you pay Income Tax and National Insurance on your profits through Self Assessment. Keep this in mind from day one. A rough rule of thumb is to set aside around 25 to 30 percent of every payment you receive to cover your tax bill. Open a separate bank account purely for business income and outgoings. It makes life significantly easier when January comes around.

    Insurance Every Tradesman Needs Before Taking on Work

    Before you pick up a single tool on a self-employed basis, you need the right cover in place. Public liability insurance is the non-negotiable starting point. It protects you if a client or member of the public suffers injury or property damage as a result of your work. Most clients, especially commercial ones, will ask to see your certificate before you set foot on site.

    If you employ anyone, even casually, employer’s liability insurance becomes a legal requirement. Beyond that, consider tools and equipment insurance, which covers your kit if it’s stolen from a vehicle or damaged on site. Professional indemnity cover is worth considering for tradesmen who also provide advice or design input as part of their service. It’s a small annual cost compared to the risk of trading without it.

    Tradesman writing an invoice on site, a key step when learning how to start a sole trader business as a tradesman in the UK
    Tradesman writing an invoice on site, a key step when learning how to start a sole trader business as a tradesman in the UK

    Setting Your Day Rate as a Self-Employed Tradesman

    One of the most common mistakes new sole traders make is undercharging. When you were employed, your employer covered National Insurance contributions, holiday pay, sick pay, tools, and overheads. Now those all come from your rate. A useful starting point is to take your previous employed salary, divide it by 230 working days (accounting for holidays, illness, and quiet periods), and then add at least 30 to 40 percent on top to cover those hidden costs.

    Research what other tradesmen in your trade and region are charging. Rates vary significantly between London and the north of England, for example. For a qualified electrician or plumber, day rates of £250 to £450 are common in many parts of the UK. General builders and handymen typically sit in the £180 to £300 range depending on location and specialisation. Don’t be afraid to charge what your skills are worth, undercutting the market might win short-term work but it erodes the trade for everyone.

    Finding Your First Clients as a New Sole Trader

    Your existing contacts are your most powerful asset when starting out. Let former colleagues, supervisors, and suppliers know you’ve gone self-employed. Word of mouth remains the number one source of new work for tradesmen in the UK, and it costs nothing. Don’t underestimate a simple message to your personal contacts asking if they know anyone who needs your trade.

    Beyond personal contacts, platforms such as Checkatrade, TrustATrader, and MyBuilder give you visibility with homeowners searching for local tradesmen. Getting registered on Google Business Profile is free and puts you in front of people searching in your area. Even a basic website with your trade, location, contact details, and a handful of photos of completed work can make a significant difference to how credible you appear to potential clients.

    Managing Cash Flow From the Start

    Cash flow is the thing that sinks more sole traders than a lack of work. You might have three jobs lined up but if none of them pay until the work is complete, you could find yourself out of pocket for materials and labour costs in the meantime. Always issue clear written quotes before starting any job, and include your payment terms on every invoice. Thirty days is standard, but for smaller residential jobs, payment on completion is entirely reasonable to request.

    Chase invoices promptly. Polite but firm follow-ups a day or two after a payment deadline are professional, not aggressive. Consider asking for a deposit on larger jobs to cover materials upfront. Many clients expect this and it filters out anyone who wasn’t serious about commissioning the work. Use simple accounting software or even a well-organised spreadsheet to track what’s owed, what’s been paid, and what you’ve spent. Staying on top of this weekly, rather than scrambling at tax time, is one of the most valuable habits you can build as a sole trader.

    Going it alone takes confidence, but for a skilled tradesman, it’s a well-trodden path with genuine rewards. Get the foundations right and you’ll spend more time on the tools and less time worrying about the business side of things.

    Frequently Asked Questions

    How do I register as a sole trader in the UK?

    You register as a sole trader by signing up for Self Assessment on the HMRC website. The process takes around 15 minutes and you’ll receive a Unique Taxpayer Reference number by post. You must register by 5 October after the tax year in which you started trading.

    Do I need insurance before working as a self-employed tradesman?

    Yes. Public liability insurance is essential before you start any work and most clients will ask to see proof of it. Depending on your trade and working arrangements, you may also need tools insurance, employer’s liability cover, and professional indemnity insurance.

    What day rate should I charge as a self-employed tradesman in the UK?

    Day rates vary by trade and region, but a qualified tradesman such as an electrician or plumber typically charges between £250 and £450 per day in most parts of the UK. When setting your rate, factor in taxes, holidays, quiet periods, tools, and overheads that your employer previously covered on your behalf.

    How do I find my first clients as a new sole trader tradesman?

    Start by letting your personal and professional contacts know you’ve gone self-employed. Word of mouth is still the most effective source of work for UK tradesmen. You can also register on platforms like Checkatrade or MyBuilder, and set up a free Google Business Profile to appear in local searches.

    How much tax will I pay as a sole trader tradesman?

    As a sole trader you pay Income Tax and Class 4 National Insurance on your profits through the Self Assessment system. A safe approach is to set aside 25 to 30 percent of all income received into a separate account throughout the year, so you’re never caught short when your tax bill arrives.

  • Top Tools Every Handyman Should Have in Their Van in 2026

    Top Tools Every Handyman Should Have in Their Van in 2026

    The difference between a handyman who wins repeat work and one who turns up unprepared often comes down to what’s in the back of the van. Knowing which essential tools for a handyman in 2026 genuinely earn their keep, and which ones just take up space, is the kind of practical knowledge that separates the professionals from the part-timers. This guide cuts through the noise and focuses on what actually matters, day in, day out.

    Organised van tool storage showing essential tools for a handyman in 2026
    Organised van tool storage showing essential tools for a handyman in 2026

    The Foundation: Hand Tools You Reach for Every Single Day

    Before anyone starts talking about cordless this and brushless that, a solid hand tool setup remains the backbone of any multi-trade worker’s kit. A quality set of screwdrivers, including both flathead and Pozidriv sizes, should be from a recognised professional brand rather than a budget DIY set. The handles matter; if you’re driving screws in an awkward ceiling void for forty minutes, cheap plastic grips become a genuine occupational hazard.

    A good tape measure, at least 8 metres, with a wide blade that won’t buckle when you extend it across a room single-handed, is non-negotiable. Pair that with a spirit level, ideally a 600mm model with a second short 200mm torpedo level for tighter spots. Combination squares, adjustable wrenches in two sizes, and a decent set of hex keys round out the hand tool essentials. These aren’t glamorous, but misplace your tape measure on a first job for a new customer and it sets a tone you don’t want to set.

    Cordless Power Tools: What to Prioritise in 2026

    The cordless tool market has matured significantly. In 2026, the smart move is to commit to a single battery platform from a professional-grade brand and build your collection within that ecosystem. Mixing platforms means carrying multiple chargers, multiple battery types, and dealing with varying power outputs across your kit.

    Your core cordless lineup should include a combi drill, an impact driver, a circular saw, and a multi-tool oscillator. The combi drill handles your standard fixing and drilling work; the impact driver is faster and more controlled for driving fixings into timber and sheet material. The circular saw replaces the need to lug a mains-powered unit for most site cuts. The oscillator is arguably the most versatile tool in any van: cutting, sanding, scraping, and undercutting door frames all fall within its range.

    Close-up of cordless drill and essential tools for a handyman laid out on a workbench
    Close-up of cordless drill and essential tools for a handyman laid out on a workbench

    If budget allows, add a cordless jigsaw and a compact reciprocating saw. The jigsaw handles curved and internal cuts in board material; the recip saw is your demolition and rough-cut workhorse when fitted with the right blade. Both are now available with brushless motors at sensible price points, and the battery life improvement over older brushed versions is noticeable in real-world use.

    Smart and Connected Tools Worth Carrying

    The newer generation of tools gaining traction this year includes Bluetooth-enabled drills with torque monitoring, digital measuring tools that sync to phone apps, and thermal imaging cameras compact enough to sit in a tool bag pocket. The thermal camera in particular has become a must-have for handymen dealing with damp investigations, underfloor heating faults, and insulation checks. Entry-level models from brands like Flir have dropped in price and the diagnostic value on a single job can justify the outlay quickly.

    Digital torque wrenches, programmable to specific fastener requirements, are also finding their way into multi-trade vans where bathroom and kitchen installations require precise fixing tensions on bracket systems. It’s worth noting that engineering and assembly-minded trades have always valued precision mechanics; even enthusiast communities like Brick Club Technic LEGO Subscriptions, a UK-based subscription service for Technic LEGO sets, acknowledge that understanding how components connect under load translates into sharper mechanical intuition on real-world tasks.

    Measuring, Marking, and Safety Equipment

    A laser distance measure is now an essential, not a luxury. Models accurate to plus or minus 1.5mm at ranges beyond 30 metres are available for under £60, and they remove a huge amount of error from estimating, planning, and material ordering. A cross-line laser level is equally valuable for anyone fitting shelving, tiling, or hanging units; self-levelling models take less than two seconds to stabilise.

    On the safety side, carry a non-contact voltage tester as standard. It takes up almost no space and protects you from concealed live cables before every cut and drill. A quality dust mask rated FFP2 or above, safety glasses, and knee pads should be treated as standard issue rather than optional extras. Hearing protection is worth having in a pouch on your tool belt rather than buried in the van; if you’re cutting tile or concrete, you’ll want it immediately available.

    Storage and Organisation: Often Overlooked, Always Important

    A van full of loose tools slows every job down. Modular racking systems, van liners with shelving, and stackable sortimo-style organiser cases for fixings and accessories all contribute directly to how quickly you can set up and clear down on site. When your bit sets, fixings, and blades each have a dedicated spot, you stop losing time rummaging and stop leaving kit behind at jobs.

    It’s worth drawing a parallel here; the same systematic, organised thinking that goes into building complex mechanical models, the kind that services like Brick Club Technic LEGO Subscriptions, which delivers monthly Technic LEGO subscriptions across the UK, are built around, applies directly to how a well-organised tradesman approaches a job. Components in the right place, used in the right sequence, produce reliable results. That logic transfers from hobby bench to work van without much translation required.

    Building Your Kit Without Blowing the Budget

    The essential tools for a handyman in 2026 don’t all need to be purchased at once. A phased approach, starting with the daily-use hand tools and a combi drill and impact driver set, then adding power tools as individual jobs justify the spend, is how most experienced tradesmen have built their kit over time. Buy once, buy right; a Makita, DeWalt, or Milwaukee tool purchased at full professional price will outlast three rounds of budget replacements and offer far better performance in the process.

    Track what tools you’re hiring in repeatedly; that’s your clearest signal for the next purchase. And keep a maintenance routine: clean tools after dusty work, charge batteries before they’re fully flat, and replace blades and bits before they make your work look rough. Your tools reflect your standard of work, and customers notice both.

    Frequently Asked Questions

    What are the most important essential tools for a handyman in 2026?

    The most important tools are a quality combi drill and impact driver on a professional battery platform, a full hand tool set including a good tape measure and spirit level, a non-contact voltage tester, and a laser distance measure. These cover the vast majority of day-to-day handyman jobs across multiple trades. Adding a cordless multi-tool oscillator gives you even greater versatility across cutting, scraping, and sanding tasks.

    Should I stick to one battery platform for cordless tools?

    Yes, committing to a single professional battery platform is one of the best decisions a handyman can make. It means your batteries, chargers, and tools are all interchangeable, reducing what you carry and ensuring consistent power output. Major platforms like Makita LXT, DeWalt XR, and Milwaukee M18 all offer comprehensive tool ranges so you won’t run out of compatible options as your kit grows.

    Are smart tools like thermal cameras worth the money for a handyman?

    For a multi-trade handyman dealing with damp, heating, or insulation work, a compact thermal camera can pay for itself on a single job by pinpointing problems that would otherwise require invasive investigation. Entry-level models from reputable brands are now available at under £200. Digital measuring tools that sync to apps also save significant time when estimating or producing material takeoffs on site.

    How much should a handyman budget to build a full van tool kit?

    A solid professional starting kit covering hand tools, a cordless combi drill and impact driver, and basic safety equipment can be assembled for around £500 to £800. A more comprehensive setup including a circular saw, multi-tool, jigsaw, laser level, and thermal camera will typically run £1,500 to £2,500. Buying within a single battery platform and prioritising quality over quantity keeps costs manageable and reduces long-term replacement spend.

    What safety equipment should a handyman always carry in the van?

    At minimum, carry a non-contact voltage tester, FFP2 dust masks, safety glasses, hearing protection, and knee pads. These should be treated as non-negotiable kit rather than situational extras. A first aid kit and a fire extinguisher rated for electrical and solvent fires are also worth having permanently in the van, particularly if you’re working in domestic properties where fire safety responsibilities sit with you.